#### 3.4.1 新建文件夹

#### 3.4.2 准备一个服务端程序

#### 3.4.3准备6个redis的配置文件


Redis-1
bind 0.0.0.0 69行
port 7000 92行
daemonize yes 136行
\# 打开aof 持久化
appendonly yes 672行
\# 开启集群
cluster-enabled yes 814行
\# 集群的配置文件,该文件自动生成
cluster-config-file nodes-7000.conf 822行
\# 集群的超时时间
cluster-node-timeout 5000 828行
\------------------------------------
Redis-2
daemonize yes
bind 0.0.0.0
port 7001
\# 打开aof 持久化
appendonly yes
\# 开启集群
cluster-enabled yes
\# 集群的配置文件,该文件自动生成
cluster-config-file nodes-7001.conf
\# 集群的超时时间
cluster-node-timeout 5000
\-------------------------------------
Redis-3
daemonize yes
bind 0.0.0.0
port 7002
\# 打开aof 持久化
appendonly yes
\# 开启集群
cluster-enabled yes
\# 集群的配置文件,该文件自动生成
cluster-config-file nodes-7002.conf
\# 集群的超时时间
cluster-node-timeout 5000
\------------------------------------
Redis-4
daemonize yes
bind 0.0.0.0
port 7003
\# 打开aof 持久化
appendonly yes
\# 开启集群
cluster-enabled yes
\# 集群的配置文件,该文件自动生成
cluster-config-file nodes-7004.conf
\# 集群的超时时间
cluster-node-timeout 5000
\-------------------------------------
Redis-5
daemonize yes
bind 0.0.0.0
port 7004
\# 打开aof 持久化
appendonly yes
\# 开启集群
cluster-enabled yes
\# 集群的配置文件,该文件自动生成
cluster-config-file nodes-7005.conf
\# 集群的超时时间
cluster-node-timeout 5000
\--------------------------------------
Redis-6
daemonize yes
bind 0.0.0.0
port 7005
\# 打开aof 持久化
appendonly yes
\# 开启集群
cluster-enabled yes
\# 集群的配置文件,该文件自动生成
cluster-config-file nodes-7006.conf
\# 集群的超时时间
cluster-node-timeout 5000
#### 3.4.3同时启动所有的redis

#### 3.4.4 使用脚本创建集群(分配槽)
找到集群脚本,在src/src/redis-trib.rb 要安装Ruby的环境【不推荐
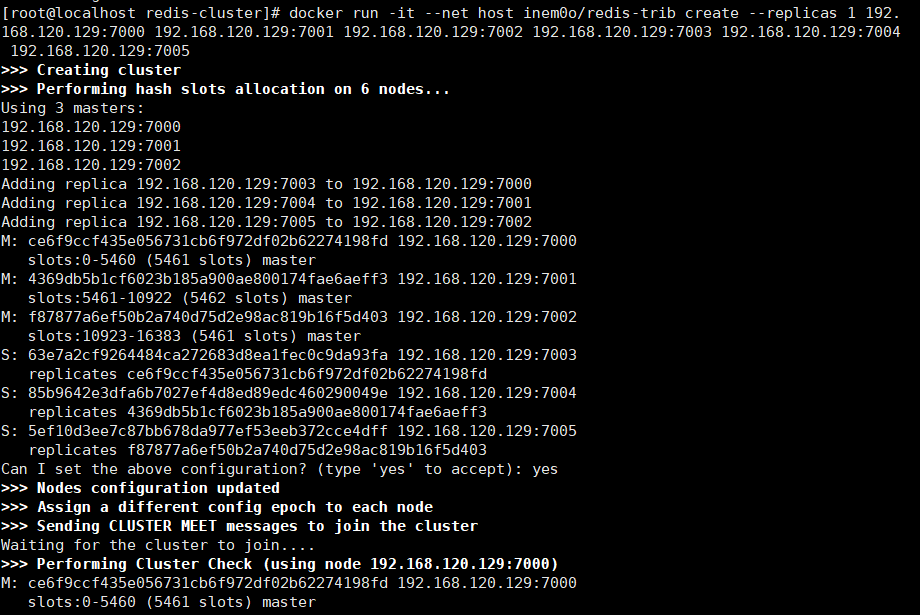
#### 3.4.5 使用docker 下载redis-trib的镜像运行【推荐】
安装Docker
yum install docker
启动docker
systemctl start docker
A: 下载镜像
docker pull inem0o/redis-trib
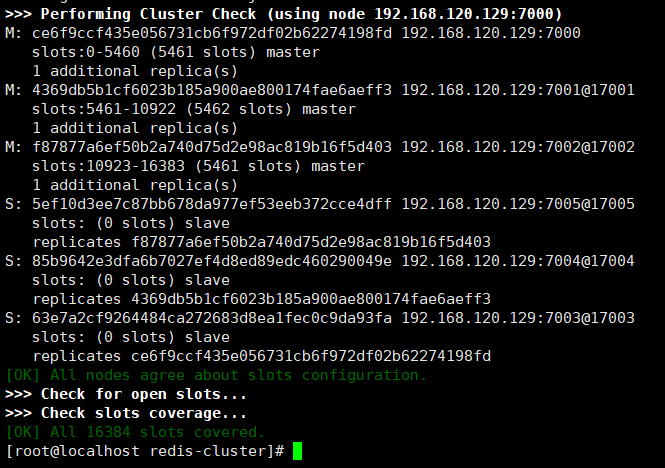
docker run -it --net host inem0o/redis-trib create --replicas 1
192.168.120.129:7000 192.168.120.129:7001
192.168.120.129:7002 192.168.120.129:7003
192.168.120.129:7004 192.168.120.129:7005
-it是为了可以输入
\--net host 是为了上docker容器能连接上本地的宿主机


#### 3.4.6测试集群环境

-c 表示连接集群


到此集群搭建完成
- 01【熟悉】NoSQL的简介
- 1,什么是NoSQL
- 2,NoSQL起源
- 3,NoSQL数据库类型
- 4,传统RDBMS VS NOSQL
- 02【熟悉】常见的NoSQL及区别
- 1,常见的NoSQL数据库
- 2,区别
- 03【熟悉】Redis简介
- 1,Redis简介
- 2,Redis的特点
- 04【掌握】Redis的安装及启动停止
- 1,下载Redis4
- 2,打开VM虚拟机把文件copy到software里面
- 3,开始安装
- 1,安装gcc 目地是编译软件
- 2,解压
- 2,把解压的文件copy到/usr/local/src里面
- 3,打开/usr/local/src/redis/deps进行编译依赖项
- 4,打开/usr/local/src/redis进行编译
- 5,在上面的Redis目录安装把它安装到/usr/local/redis里面
- 6,验证安装是否成功
- 7,把配置文件移动到/root/myredis目录[目录可以自定义] 可以为/root/myredis
- 8,启动Redis
- 9,默认情况,Redis不是在后台运行,我们需要把redis放在后台运行
- 10,再次启动查看进程
- 11,客户端链接和退出
- 12,停止redis
- 13,开机自启Redis的配置
- 14,bin目录的文件说明
- 3,redis配置[后面细说]
- 05【掌握】启动后相关知识串讲
- 1,单进程单线程
- 2,默认16个兄弟一起站台
- 3,切换数据库命令
- 4,常用基本命令
- 5,其它说明
- 6,为什么默认端口是6379
- 06【掌握】redis的数据类型
- 1,概述
- 2,字符串类型
- 3,list数据类型
- 4,hash数据类型
- 5,set数据类型
- 6,zset(sortset)数据类型
- 07【掌握】Redis的相关命令详解
- 1,常用命令
- 2,string类型相关命令
- 3,list
- 4,hash
- 5,set
- 6,zset
- 08【熟悉】解析配置文件redis.conf
- 1,配置文件在哪
- 2,Units单位
- 3,INCLUDES包含
- 4,NETWORK通用
- 5,GRNERAL通用
- 6,SNAPSHOTTING快照
- 7,REPLICATION复制
- 8,SECURITY安全
- 10,APPEND ONLY MODE 追加[持久化再说]
- 09【宝典】常见配置redis.conf介绍
- 10【掌握】Redis的持久化
- 1,概述
- 2,RDB【Redis DataBase】
- 2.1,什么是RDB
- 2.2,什么是FORK
- 2.3,保存位置及配置位置
- 2.4,如何触发RDB快照
- 2.5,如何恢复数据
- 2.6,优点
- 2.7,缺点
- 3,AOF
- 3.1,概述
- 3.2,原理
- 3.3,保存位置及位置配置
- 3.4,AOF启动/修复/恢复
- 3.5,优势
- 3.5,劣势
- 4,说了那么多,我们选择哪一个呢
- 4.1,官方建议
- 11【了解】Redis的事务
- 1,什么是Redis事务
- 2,能为我们做什么
- 3,怎么使用呢?
- 3.1,常用命令
- 3.2, 情况1:正常执行
- 3.3,情况2:放弃事务
- 3.4, 情况3:全体连坐
- 3.5,情况4:冤头债主
- 3.6,情况5:watch监控
- 4,3阶段
- 5,3特性
- 12【熟悉】Redis的复制(Master/Slave)
- 1,什么是复制
- 1.1,官网说明
- 1.2,行话
- 2,有什么作用
- 3,怎么使用
- 3.1,配从不配主
- 3.2,配置命令 【SLAVEOF 主库IP 主库端口】 (Redis重启后需要重新配置)需要把Redis都启动后,进入从机中,然后执行命令
- 3.3,详细操作
- 3.4,一主二仆
- 3.5,薪火相传
- 3.6,反客为主
- 4,复制的原理
- 5,哨兵模式
- 5.1,什么是哨兵模式
- 5.2,怎么玩(使用步骤)
- 5.3,一组sentinel能同时监控多个Master
- 6,复制的缺点
- 13【掌握】高可用高并发集群配置
- 1,中心化和去中心化
- 1.1,中心化
- 1.2,去中心化
- 2,Redis集群的执行流程分析
- 2.1,哈希槽说明
- 2.2,执行流程分析
- 3,Redis集群的搭建
- 3.1,文档
- 3.2,原理:去中心化
- 3.3,集群规则
- 3.4,搭建过程
- 14【掌握】Redis客户端使用
- 1, 工具说明
- 2, 下载客户端redis plus
- 3,安装
- 3,连接
- 15【掌握】java连接redis
- 1,Jedis所需要的jar包依赖
- 2,Jedis常用操作
- 2.1,测试连通性
- 2.2,常规操作【自学】
- 2.3,事务提交
- 2.4,主从复制
- 3,JedisPool
- 3.1,为什么要使用JedisPool
- 3.2,案例见代码
- 16【掌握】spring里面使用
- 1,spring集成redis
- 1.1,创建项目
- 1.2,修改pom.xml
- 1.3,搭建spring的环境
- 2,实现菜单数据的缓存
- 2.1,简单原理图
- 2.2,修改pom.xml
- 2.3,创建Menu
- 2.4,创建MenuMapper
- 2.5,创建MenuMapper.xml
- 2.6,创建MenuService
- 2.7,创建MenuServiceImpl
- 2.8,application-dao.xml
- 2.9,application-service.xml
- 2.10,application-redis.xml
- 2.11,applicationContext.xml
- 2.12,log4j.properties
- 2.13,db.properties
- 2.14,CacheAspect
- 2.14,application-aspect.xml
- 2.15,applicationContext.xml
- 2.16,打断点测试
- 17【掌握】spring+redis实现秒杀
- 18【掌握】springboot中使用redis
- 1,创建项目并选择依赖
- 2,spring boot 如何加载默认的对象
- 3,修改配置文件yml
- 5, RedisTemplate<Object,Object>(扩展String类型)操作Redis
- 6,集群的额外操作
- 18【掌握】springboot使用redis做缓存
- 修改仓库管理项目把前的缓存改成redis
- 添加依赖
- 配置yml
- 修改切面类
- 使用spring提供的注解方式来操作redis
- 开启缓存注解
- 修改ProviderService
- 修改ProviderServiceImpl
- 修改ProviderContrller
- 更改序列化的方式[创建配置类去解决]
- 注意点
- 19【掌握】Redis键和值的设计原则
- 1、redis value 值格式
- 2、redis key 键格式
- 20【掌握】面试中要知道的
- 1,Redis支持的数据类型?
- 2,什么是Redis持久化?Redis有哪几种持久化方式?优缺点是什么
- 3,Redis 有哪些架构模式?讲讲各自的特点?
- 4,什么是缓存穿透?如何避免?什么是缓存雪崩?何如避免?
